

Yep, it’s one of those – ombre rose cakes seem to have popped up everywhere (by everywhere I mean on Tumblr and wedding Pinterest boards). I made a two-layer red velvet rose cake last year for a 1920’s party, but in hindsight that was just a trial run for the real deal. When I got hired to make the cake for a bridal shower, I knew it was time to break out the ombre!

In order for the cake layers to have a three-color gradient, the batter had to be white. I went on a hunt for the perfect white cake recipe, and decided on the one that used the least egg whites. Turns out this is also the best white cake I’ve ever had (I never choose white cake over a different cake flavor. Ever.) The light vanilla flavor and fluffy texture makes it taste more like a cloud and nothing like boxed white cake mixes.
The filling is a dreamy white chocolate frosting that I absolutely loved, even though I’m not usually big on frosting. This is not your standard butter + confectioner’s sugar American buttercream – it’s silky smooth and not too sweet, so good that I ate leftover frosting with cake scraps for days afterwards. So there you have it – a seal of approval on a white cake with white chocolate frosting coming from someone who doesn’t like white cake or frosting.
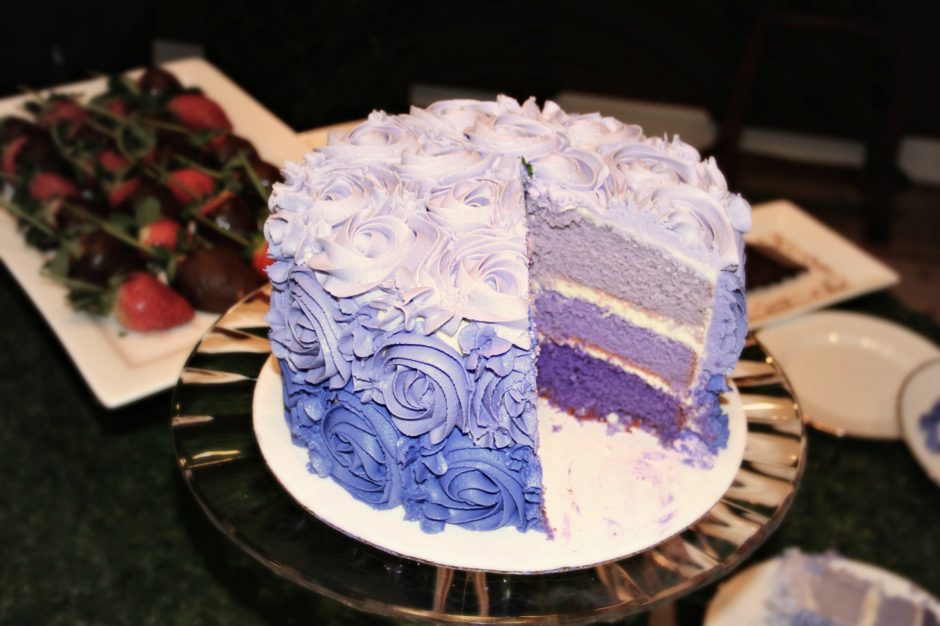
As for the roses, I used a crusting buttercream so that the roses would hold their shape. The recipes calls for both butter and shortening, a scary amount of sugar, and almond extract, so it tastes better than other crusting buttercream recipes I’ve tried.
I’m not kidding when I say the piping tip does all the work for you. Since cakes are a nightmare to transport without ruining the decorations, I decided to bring the crumb-coated cake to the bridal shower looking naked. I filled three frosting bags fitted with Wilton 1M tips with the different colors of buttercream beforehand, and finished the roses in less than 20 minutes on-site. No damaged roses.

They say that practice makes perfect, and it’s true. I feel like I gained so much experience doing all the baking for the bridal shower (I made the favors too, more on that later) and if I were to do it again, it would take half as long. Because even though this was incredibly time consuming, it was also incredibly rewarding. I got to dip my toes into the catering world. I got to try new recipes. And, I realized that I’m capable of a lot more than I thought I could do. Not to mention the fact that I can definitely get a prom dress with my paycheck 🙂 Pretty cake (and cookies) for a pretty dress – I’d say it’s a fair trade!

Recipe: White Ombre Layer Cake with White Chocolate Filling
Ingredients
For the cake layers:
- 2 1/2 cups of cake flour
- 3/4 cup all-purpose flour
- 1 tablespoon baking powder
- 1 teaspoon baking soda
- 3/4 teaspoon salt
- 1/2 cup (1 stick) unsalted butter, softened
- 1/2 cup vegetable shortening
- 1 3/4 cups sugar
- 1 tablespoon pure vanilla extract
- 1 large egg
- 1 1/2 cups ice cold water
- 3 large egg whites, at room temperature
- 1/4 teaspoon cream of tartar
- Gel food coloring
- Wilton White White Icing Color (optional)
For the white chocolate frosting
- 6 ounces white chocolate, coarsely chopped
- 1 1/2 cups sugar
- 1/3 cup all-purpose flour
- 1 1/2 cups milk
- 1/3 cup heavy cream
- 1 1/2 cups (3 sticks) unsalted butter, softened, cut into small pieces
- 1 teaspoon pure vanilla extract
Instructions
Make the cake layers:
- Preheat the oven to 325 degrees F. Butter and line three 8-inch round cake pans with parchment paper. Butter the parchment. Dust with flour, and knock out the excess flour.
- Sift the flours, baking powder, baking soda, and salt together in a large bowl. Set aside.
- In the bowl of an electric mixer fitted with the paddle attachment, beat the butter and shortening on medium speed until creamy, 3 to 4 minutes. Add the sugar and vanilla and beat on medium speed until fluffy, about 3 minutes. Scrape down the bowl, add the egg, and beat until just combined. Turn the mixer to low. Add the flour mixture, alternating with the ice water, in three separate additions, beginning and ending with the flour mixture. Scrape down the bowl, then mix on low speed for a few more seconds.
- In a medium bowl, whisk the egg whites and cream of tartar until soft peaks form. Do not overbeat. Gently fold the egg whites into the batter.
- Evenly divide the batter into three bowls. Tint each bowl of batter the desired color, using Wilton’s White-White icing color to lighten each shade if needed. Make sure the color is blended evenly to prevent streaks in the layers.
- Pour each color into the prepared pans and smooth the tops. Bake for 40 to 45 minutes, rotating the pans halfway through the baking time, until a toothpick inserted in the centre of the cake comes out clean. Transfer the cakes to a wire rack and let cool for 20 minutes. Invert the cakes onto the rack, remove the pans, and let cool completely. Remove the parchment.
Make the white chocolate frosting:
- Using either a double boiler or a microwave oven, melt the white chocolate and set it aside to cool.
- In a medium heavy-bottom saucepan, whisk the sugar and flour together. Add the milk and cream to cook over medium heat, whisking occasionally, until the mixture comes to a boil and has thickened, about 20 minutes.
- Transfer the mixture to the bowl of an electric mixer fitted with the paddle attachment. Beat on high speed until cool. (This takes a very long time. I set my bowl in cold water to speed up the process, beating constantly.) Reduce the speed to low and add the butter; mix until thoroughly incorporated. Increase the speed to medium-high and beat until the frosting is light and fluffy.
- Add the vanilla and white chocolate and continue mixing until combined. If the frosting is too soft, put the bowl in the refrigerator to chill slightly, then beat again until it is the proper spreading consistency. If the frosting is too firm, set the bowl over a pot of simmering water and beat with a wooden spoon until it is the proper consistency.
Assemble the cake:
- Once all the cake layers are cool, place a small amount of frosting in the middle of a round cakeboard to prevent the cake from moving around. Place the darkest layer in the center, and level the top as needed. Using a icing spatula, evenly spread about 1 1/4 cups of the frosting on top. Add the next layer, trim and frost it, then add the lightest layer. Crumb coat the cake and refrigerate the cake in a cake dome or cake saver.
Number of servings (yield): 1 3-layer 8-inch cake
Recipe adapted from The Whiteout Cake in Baked: New Frontiers in Baking by Matt Lewis & Renato Poliafito
Recipe: Crusting Buttercream Rosettes
Ingredients
- 2 lbs. sifted powdered sugar
- 1/2 cup (1 stick) butter, softened
- 1-1/2 cups solid vegetable shortening (Crisco)
- 2 tbsp. clear vanilla extract
- 1/3 cup water + more as needed
- 1/4 tsp. almond extract
- Gel food coloring
- Piping bags
- 3 Wilton 1M icing tips
Instructions
- Cream butter, shortening, and extracts until creamy and smooth. Gradually add powdered sugar and water. Mix thoroughly on medium speed for hand mixers, low speed for stand mixers, until smooth and creamy. Do not overmix or mix on high speed. If the frosting is too stiff to pipe, add very small amounts of water at a time.
- Divide the icing into three bowls. Tint each bowl the desired shades. Place a 1M tip into a piping bag, roll over the edges of the bag, and fill with the lightest shade of frosting. Unroll the edges and twist the bag to push the frosting down. Repeat with remaining icing colors.
- Remove the crumb-coated cake from the refrigerator and place it on a turntable or lazy susan. Starting with the darkest shade of frosting, pipe a row of rosettes starting at the bottom of the cake. To make the roses, hold the bag perpendicular to the cake and make a swirl starting from the center. This video will do a better job of explaining it than I ever could.
OMG!! Impressive! Stunning! I’m sure you will get more requests for future gatherings!
thanks sharon! it would be fun to do more cakes like these!
Wow! This cake looks so professional. You did an amazing job. This is the best looking purple cake I have ever seen.
aww thank you so much! it means a lot 🙂